Working with action buttons in an Access app
When you create or use a Microsoft Access app, you use the action buttons on the Action Bar to perform various tasks such as adding, modifying or deleting records. Action buttons are somewhat like the controls on a view. Some action buttons are predefined which cannot be changed but you can add custom action buttons to the Action Bar to suit your app needs. Each view in an Access app displays specific predefined action buttons in the Action Bar that can be performed from that view. This article gives you an overview of the predefined action buttons and explains how you can add custom action buttons to a view. If the Action Bar is hidden by the app developer, the action buttons are not visible. If the record source of the view is set as read only, the action buttons will also not be available as you will only be able to view the data.
For more information, see creating an Access app.
This article doesn't apply to Access desktop databases. For information concerning forms and navigation in desktop databases, see create an Access form.
What do you want to do?
Overview
The type of action buttons displayed on the Action Bar depend on the view that you are using. The predefined actions automatically perform specific tasks. If you hover over an action button, its functionality is displayed. The following image is a sample of actions on an Action Bar, and their respective functionality:
| Actions: | | |||||
| Functionality: | Add Delete Edit Save Cancel | |||||
Actions such as Add, Delete and Save are predefined by Access and these can be performed in the context in which they appear. If you remove a predefined action from a view, you can't add it back. Predefined actions can't be modified from any of the view types. You can add custom actions to most views and we'll see how later in this article. In the next section, let's take a look at how you can use the predefined actions.
Datasheet views include a Download in Excel action button.
Views and actions
Access displays specific predefined action buttons in the Action Bar with views based on tasks that you can perform from that view. This following table lists the availability of the predefined action buttons for various views and when they are enabled.
List : This view displays the most number of actions. Add, Delete, Edit, Save, and Cancel action buttons are available from the List view.
| Condition | Actions enabled |
| When adding the first record | Save and Cancel |
| When adding records when other records already exist | Save and Cancel |
| When reading updatable data | Add, Delete, and Edit |
| When reading non-updatable data | None |
| When editing a record but you have not made any record changes | Cancel |
| When editing a record and you have uncommitted changes | Save and Cancel |
Datasheet view : Add, Delete, and Download in Excel action buttons are available from the Datasheet view. Add and Delete are enabled at all times except when entering data on a new record. The Download in Excel action button is enabled at all times in Datasheet views.
Summary view : None of the action buttons are available from the Summary view.
Blank view : Action buttons only appear in the Action Bar for Blank views when the record source property is set. The action buttons that appear In Blank views are inherited from the List view.
Note: Predefined action buttons are not enabled for a view if the view is opened as a popup through a Summary view. When opening a view as a popup from a Summary view, Access sets the data as non-updatable.
Predefined actions
Access apps provide six predefined action buttons that are displayed on the Action Bar based on the view type you select. The number of predefined actions shown depends on the view type. While you cannot edit predefined action buttons, you can change the order in which they appear on the Action Bar or hide the entire Action Bar in a view.
Note: Hiding the Action Bar is not recommended unless you provide alternate navigation options for your app.
The following table includes the predefined action buttons, their functionality and keyboard shortcuts:
| Button | Action | Keyboard shortcut |
| | Add new record | N or Alt + N |
| | Delete record | Delete |
| | Edit record | E or Alt + E |
| | Save record | Ctrl + S |
| | Cancel changes | Escape |
| | Download in Excel |
Note: When you create a new Blank view in an Access app, predefined action buttons are not displayed until you define a record source for the view.
Using predefined actions
Add a record
The Add new record action button is available in List and Datasheet views if the view has a record source that is updateable. The Add new record action button is also available in Blank views if the view has a defined record source and is updateable. Use the Add action button to add a new record to a table. To use the action, complete the following steps from an opened Access app:
-
Click the List view. (You can also add records from Datasheet and Blank views.)
-
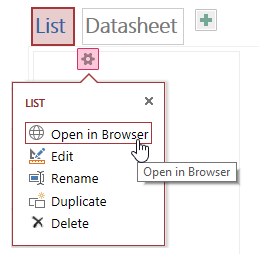
Click the property button and click Open in Browser.

-
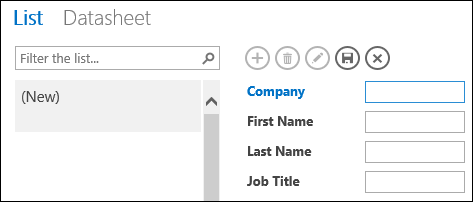
After the list view opens in your web browser, click Add
 and the fields are displayed.
Note: Only the Save and Cancel actions are available at this point.
-
Add the information for the new record and click Save
 .
.
Repeat step 3 and step 4 to add more records.
Delete a record
The Delete record action button is available in the List, Blank and Datasheet views if the view has a record source that is updateable.
-
To delete a record, open the table in either Datasheet, Blank or List view.
-
Select the record, and then click the Delete
 action.
 -
When Access asks you to confirm the delete action, select one of the following options:
-
To cancel the delete action, click No.
-
To continue with the delete action, click Yes.
-
When you delete a record, the record no longer appears in the view and you'll see the following changes:
-
The record immediately after the deleted record is highlighted.
-
The previous record is highlighted, if you deleted the last record in a table,
-
The remaining record in a table is displayed, if it is the only remaining record, the view switches to display the no-records view.
Edit a record
The Edit  record action button is available only in List and Blank views when the view has a record source that is updateable. When you open the List or Blank view, the Edit, Add and Delete action buttons are available.
-
To edit an existing record, open the table in List view in your web browser and click the Edit record action button.
-
Make the required changes and then click the Save action button.
As you start modifying data in a field, the Cancel and Save actions become available.
Save a record
The Save record action button becomes available after you modify information for a record in a List or Blank view. When you click the Save record action button in an Access app, the modified data is sent to the server. If there is a save conflict, Access displays an error message.
Note: The Save record action button is not available when the record is in read mode or when the view has a record source that is not updatable.
Note: Datasheet views do not include a Save record action button because Access automatically attempts to save any record changes when you move to a different record.
Cancel changes to a record
You can cancel any data modification from List and Blank views if, a record has unsaved changes and if the view has a record source that is updatable.
To cancel any changes to a record soon after you made it:
-
Click the Cancel action button. The recently edited fields display the values stored in the database.
The Save and Cancel action buttons become unavailable after you perform a cancel action and the fields change to the read only mode.
Download in Excel
You can download records from your Access app into Excel from Datasheet views.
To download records into Excel:
-
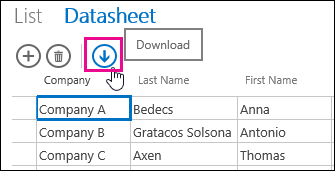
Click the Datasheet view when viewing the app in your web browser.
-
Click the Download in Excel
 action button.
-
Click Open to open the Excel spreadsheet, click Save to save the spreadsheet to a folder, or click Cancel to cancel downloading the records into Excel.
-
Excel displays the records from the Datasheet view.

Tip: If you use the filter options in the Datasheet view to restrict the records shown to a smaller set of records before clicking the Download in Excel action button, Access still downloads all the records from the view's record source into Excel. If you want to download a smaller set of records, you can open a Datasheet view from a different view using the OpenPopup macro action and use the Where clause argument to filter the records to a smaller subset. If you click the Download in Excel action button on the Datasheet view in this case, Access downloads the smaller subset of records into Excel.
Note: The Download in Excel action button can't be removed from Datasheet views. If you don't want to display this action button, you'll need to hide the Action Bar for the Datasheet view.
Moving and hiding actions
Access displays the action buttons on each view in a predetermined order. If you want to change the display order of any of the action buttons, click and hold the button and drag it to a new position on the Action Bar. Changing the order of the action buttons doesn't change their behavior when using your Access app. The tab order automatically changes to reflect the new order.
If you remove an action button from a view, you can't restore the action button at a later time. If you want to restore a deleted action button, create another new view.
You can hide action buttons using user interface macros. Use the SetProperty macro action and select Visible in the Property box and enter Yes or No in the Value box. In the Control Name box, enter the appropriate action button name. To find the name of a custom action, open the view in design mode in Access, click the custom action, and then click the Data property button. The name of the custom action is listed in the Control Name box.
| Action | Action button name |
| Add new record | addActionBarButton |
| Delete record | deleteActionBarButton |
| Edit record | editActionBarButton |
| Save record | saveActionBarButton |
| Cancel changes | cancelActionBarButton |
Note: In Datasheet views you can't remove the Download in Excel action button, move it to a different display position, or hide it using user interface macros. The name of the Download in Excel action button is not exposed.
Learn how to customize a view with a user interface macro.
Showing and hiding the Action Bar
If you have permissions to change the design of an Access app, you can choose to show or hide the entire Action Bar for a specific view. When you choose to hide the Action Bar for a view, all predefined and custom action buttons are not available when you open the view in your web browser.
To change the visibility of the Action Bar, complete the following steps from an opened Access app:
-
Click the view to want to change. You can choose a List, Blank, or Datasheet view.
-
Click the property button and then click Edit to open the view in Edit mode to make design changes.
-
Click the Formatting property button for the view.

If you can't find the Formatting property button for the view, click an empty space in the view grid away from any control.
-
To show the Action Bar, select Visible in the ActionBar Visible property box. To hide the Action Bar, select Hidden in the ActionBar Visible property box.
-
Save your view changes.
Create and use custom actions
If you have permissions to change the design of an Access app, you can add new actions to the Action Bar and customize it to run on click by using macros. You can also change existing macro actions from the Access app designer.
You can add up to seven custom actions to a view. When you reach the maximum limit, Access displays a message indicating that the limit has been reached. If you see this message, you can delete existing custom actions and add more actions.
Unlike predefined actions, custom actions can be created and modified. You also can select the icon for a custom action and its position on the Action Bar.
-
To change the order in which a custom action is displayed, click on the custom action button and drag it to a new position on the Action Bar. The tab order automatically changes to reflect the new order.
Add a custom action
-
Open the Access app, from the Navigation Pane right-click the view where you want to add the action, and then click Open.
Tip: If the Navigation Pane is not visible, from the Home tab, click Navigation Pane.
-
Click Add custom action button.

-
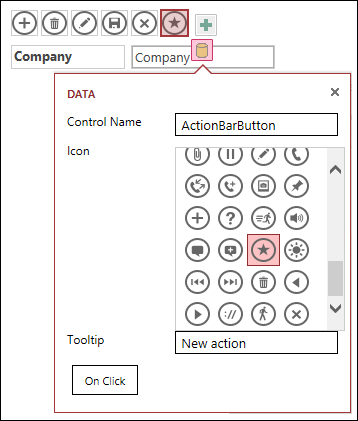
Click to select the custom action and then click the Data property button.

-
To customize the action, make changes to the following properties:
-
Control Name: Type a name for the action.
-
Icon: Click the arrow next to the default icon and pick an icon from the gallery. Make sure that you pick one that is not already on the Action Bar or you will have duplicate icons displayed.
-
Tooltip: You can add a brief description of the action. Adding a tooltip is optional but it can be helpful to others if they are able to see a description of what action is performed upon clicking the button.
-
-
Click On Click and add a macro action for the button.
-
Right-click the macro tab, save and then close it.
Learn how to customize a view with a user interface macro.
Edit a custom action
-
Click to select the action.
-
Click the Data property button, and then make your changes.
Delete a custom action
-
Select the action and press Delete on your keyboard.
You can also select and delete multiple custom actions at the same time. When you delete an action, the icon is removed from the Action Bar but not from the icon gallery.
Undo a deleted custom action
-
Click the undo button
 on the Quick Access Toolbar.
Move a custom action button on the Action Bar
-
Click and hold the button and drag it to a new position on the Action Bar.
Next Steps
-
Learn how to add custom actions to the Action Bar.
-
Learn how to customize a view with a user interface macro.


發佈留言