Add users and domain to Office 365
| | VERIFY YOUR DOMAIN | |
-
Sign in to Office 365 and go to the setup wizard.
-
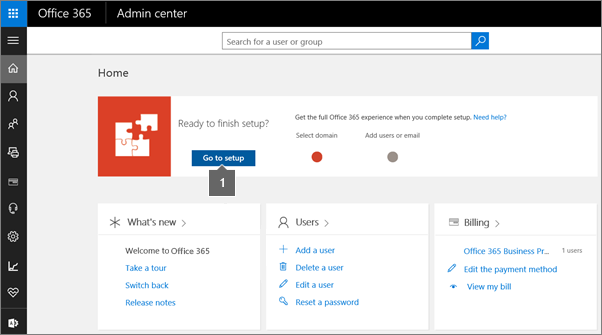
Choose Go to setup on the Office 365 admin center to start the wizard.
-
Enter the domain name you want to use (like contoso.com).
-
Follow the steps in the wizard to add a TXT or MX record that verifies you own the domain.

| | ADD YOUR USERS | |
By updating your domain's MX record in the next step, every email sent to that domain will start coming to Office 365. Make sure you've created mailboxes in Office 365 for everyone who has email on your domain BEFORE you change the MX record. Otherwise, they'll lose any email sent to them at your domain when you switch email for the domain over to Office 365.
-
Add yourself and anyone who will need an email address in Office 365.
-
If you had email before moving to Office 365, you can choose to migrate the data now.
If you are moving from another email provider and want to copy your data later, you can follow these steps to copy your email and other data.
| | SET UP SERVICES AUTOMATICALLY | |
To finish, you have to update some records at your DNS host or domain registrar.
-
The setup wizard typically detects your registrar and gives you a link to step-by-step instructions for updating your NS records at the registrar website. If it doesn't, follow these general steps for changing NS records.
-
Office 365 will automatically set up email and other services for you.
If you have a website with your domain, like www.contoso.com, follow the Manual DNS steps below.
MANUAL DNS SET UP (EXPERTS ONLY)
Choose this option if you know exactly what you're doing:
-
You're comfortable managing DNS settings
-
You have no questions about Office 365
-
You've administered similar services before
Check the drop-down menu for your DNS hosting provider and follow the instructions to update all the necessary DNS records.
If you don't know the DNS hosting provider or domain registrar for your domain, see Find your domain registrar or DNS hosting provider.
- Select your registrar
- 1&1 Internet
- 123-reg.co.uk
- Aabaco Small Business
- Active24
- Amazon Web Services (AWS)
- Asia Registry
- Blacknight
- Bluehost
- Cloudflare
- Crazy Domains
- DNSMadeEasy
- DomainExplorer.com
- Domain Monster
- DotPH
- Dreamhost
- Dyn.com
- Dynadot
- eNomCentral
- Europe Registry
- Fasthosts.co.uk
- Freeparking.co.nz
- Gandi.net
- GoDaddy
- Google Domains
- Heart Internet
- Hostgator
- Hover (Tucows)
- iFastNet
- IP Mirror
- Melbourne IT
- MyDomain
- myhosting.com
- name.com
- Names.co.uk
- Namecheap
- NearlyFreeSpeech.net
- Net4.in
- Netfirms
- Nettica
- Network Information Center (NIC)
- Network Solutions
- NoIP
- Register.com
- Register365
- TransIP
- United Domains
- Domain managed by Google (eNom)
- Domain managed by Google (Go Daddy)
- Whiz.in
- Yahoo! Small Business
- Azure DNS zones
(An automated option is available.)
| | YOU'RE DONE! | |


發佈留言